On October 8, the 3rd Zhongwang 3D Global Innovation Competition officially began. The entries can be any household items related to life, such as table lamps, tableware, furniture, and small appliances. In order to help everyone warm up, Xiaobian shared with you a 3D CAD design of electric baking pan design example tutorial, which was written by Zhongwang 3D technology fans. It is very detailed, including three parts. The first part is the outline of the main body. Modeling, the second part is the modeling of the base, and the third part is the modeling of the cover. Even friends who are new to 3D CAD design can easily master! Today, I will teach you how to complete the 3D CAD design of the theme contour through Zhongwang 3D, an easy-to-learn and easy-to-use 3D CAD software.
 Quickly design electric baking pan with 3D cad in 3D
 The complete electric baking pan 3D CAD drawings, including the main body contour, base and cover, can be downloaded free of charge in the 3D technical exchange area.
1. Quickly insert sketch 1 on the XY plane, draw the graph shown in Figure 1, the data is as shown in the figure (four arcs are tangently connected), click “Connect†after drawing, and connect them into one whole; click on the shape-- Stretch, stretch the sketch 1, the data is as shown in the figure; insert the sketch 2 in the YZ plane, draw the curve shown in Figure 3, which is roughly similar.
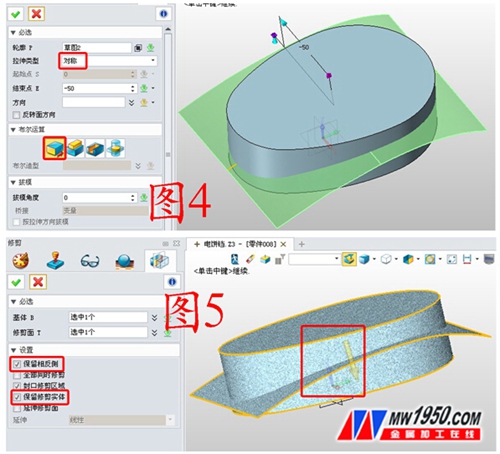
2. Click on the stretch--base, stretch the sketch 2, form the surface, name it surface 1, as shown in Figure 4; click on the shape--trim, "base" is the solid shape, "trimming surface" is the surface 1, as shown in Figure 5. , notice that the direction of the yellow arrow in the red box is the direction you want to keep. Also, check the front of the trimmed body and leave the surface 1.
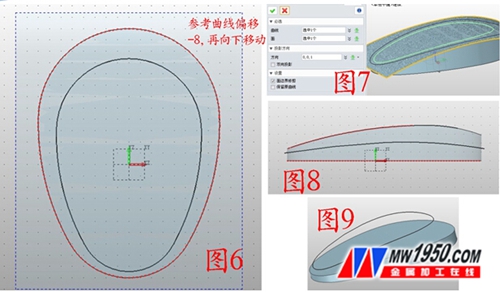
3. Insert the XY plane as sketch 3 and draw the closed curve shown in Figure 6. (Drawing technique: set the part indicated by the red dashed line as the reference curve, click the offset, offset the red dotted line by -8, and offset You can get the black solid line. Due to the different versions, some offsets may still be red dashed lines. Right click on the dotted line and click to convert it into an editable solid line, then move it down a little distance); Click on the wireframe--project to the surface, the curve select sketch 3, the surface select surface 1, as shown in Figure 7, the projected curve is named curve 1, hide the surface 1; insert the sketch in the YZ plane, draw the curve shown in Figure 8, Then follow the method of step 2, first stretch and trim, the effect is shown in Figure 9.
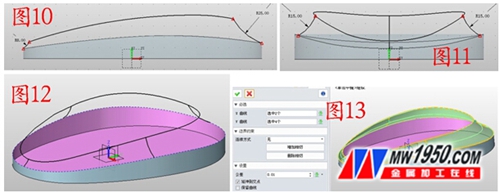
4. Insert a sketch on the YZ plane, click the reference curve--intersection curve, set the reference point according to Figure 10, and draw the arcs with the radius of 8 and 25 between the two reference points, respectively named curve 2, curve 4; Similarly, insert a sketch on the XZ plane and draw two arcs with a radius of 15, named curve 3 and curve 5, respectively, as shown in Figure 11. Delete the upper surface of the solid shape and name the open edge as edge 1, such as Figure 12; Click on the surface - U / V surface, "U curve" is curve 1, edge 1, "V curve" is curve 2, 3, 4, 5, as shown in Figure 13.
5. Display surface 1, click on the surface - curve trim, face select surface 1, the curve is the open side in Figure 13, pay attention to the "reserved surface" select the part inside the "circle", as shown in Figure 14; click repair - stitching, All parts are selected for stitching, and the effect is shown in Figure 15.
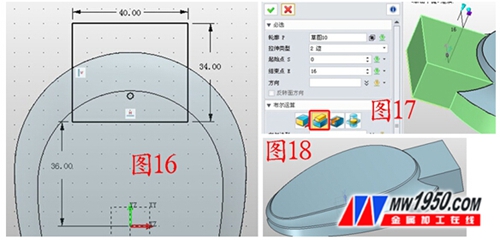
6. Insert the XY plane into the sketch 4, draw the rectangle shown in Figure 16, the parameters are as shown; click the stretch--add operation, stretch the sketch 4, the data is shown in Figure 17; As shown in Figure 18;
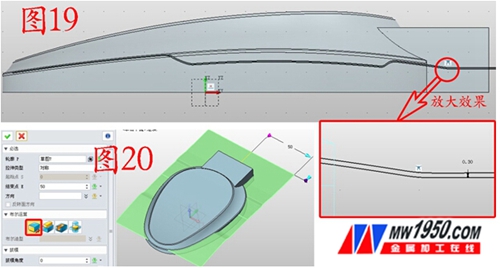
7. Insert sketch 5 on the YZ plane and draw the graph shown in Figure 19 (two closed graphs with a spacing of 0.3); click Stretch - Base. Stretch the sketch 5, the parameters are shown in Figure 20.
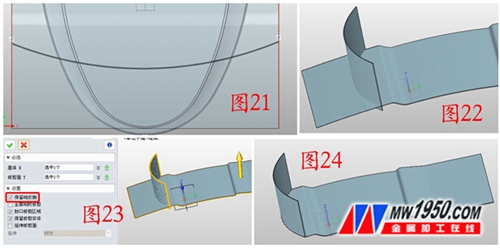
8. Insert sketch 5 on the XY plane, draw the closed graph shown in Figure 21, and then sketch the sketch 5 after exiting the sketch, hide the electric baking pan shape, as shown in Figure 22; click on the shape - trim, the "base" is vertical The entity, "trimming face" is the upper surface of the horizontal entity, pay attention to the retention direction, as shown in Figure 23; similarly, trim into the shape shown in Figure 24.
9. Display the electric baking pan shape, click on the shape--combination--subtraction operation, the "base" is the electric baking pan shape, the "combined body" is the vertical entity, as shown in Fig. 25; similarly, the horizontal entity is combined again, the effect is as follows Figure 26; round the shape of the shape, as shown in Figure 27.
At this point, the general outline is easily completed, and divided into upper and lower parts, select the upper part, click Edit - copy - geometry to the part, named "top cover"; similarly, the lower part is named "base ". Exit the edit, create a new file, name it "Assembly", click on the Insert component, and insert the "Upper Cover" and "Base" respectively. Note that the coordinates are "0,0,0" when inserting. The next tutorial will teach you how to draw the base.
If you have any questions when you are studying the 3D CAD design of this electric baking pan theme contour, you can participate in the online training of Zhongwang 3D. The expert teacher will answer you in time and guide you to make full use of Zhongwang 3D humanized function operation. Guide, learn the new features of 3D2014SP version, and get familiar with the operation of 3D CAD software as soon as possible, and design excellent works. You can also participate in the hot 3D Zhongwang 3D Global Innovation Design Competition and win a prize of up to 100,000 yuan! Click to download the latest version of Zhongwang 3D2014Sp, participate in free training, design better works to win the best designers in the world.
3D CAD in the 3D fast design electric baking pan tutorial (middle): base modeling
Http://
3D CAD in the 3D fast design electric baking pan tutorial (below): cover modeling
Http://
Kylin Chemicals manfacturers & supplies high performance flocation flocculants & collectors, serving the various mining industries like coal, phosphorous, copper, lead, nickle, gold, silver, potassium & sand-washing, etc. Our advanced manufacturing facilities and effective quality control systems, ensures every delivery of goods fully meets/exceeds our customers` end using needs. Today, our flocation flocculants & collectors have been widely accepted by various mining industries in Southeast Asia, Middle East and Latin America.


Flotation Flocculants & Collectors
Flotation Flocculants & Collectors,Potassium Amyl Xanthate,90% Potassium Amyl Xanthate,Industrial Potassium Amyl Xanthate
Kylin Chemicals Co., Ltd. , http://www.kylin-chemicals.com